...but I haven't lost interest in doing my nails! Here are some iPod (I'm not cool enough to have an iPhone) photos of some recent over-the-summer manicures. These were inspired by some designes that I came across on Pinterest (Check out my nail art board to see the originals). My favourite manicure to do as of late is a double accent nail. Now that nail art is becoming more trendy, I feel like I need to be ahead of the game. Pretty soon I will probably be rocking different designs on all of my nails ALL of the time!
The chevron nail was my biggest challenge. I tried to free-hand it, and failed. Then I tried to cut out tape guides... also a failure. I ended up painting scotch tape with black nail polish, and carefully cutting out chevron strips using an exacto knife. It was time consuming and required a lot of patience, but I was thrilled with the results! I have since ordered nail art stickers from here, so the next time I attempt chevrons, it shouldn't be as much of a struggle ;) Until next time (whenever that may be!), Hayley
Last week on April 11th, many people recognized "Day of Pink", an international day against bullying and discrimination, and for inclusiveness.
The International Day of Pink was started in Nova Scotia when 2 straight high school students saw a gay student wearing a pink shirt being bullied. The 2 students intervened, but wanted to do more to prevent homophobic & transphobic bulling. They decided to purchase pink shirts, and a few days later got everyone at school to arrive wearing pink, standing in solidarity. The result was that an entire school stopped homophobic & transphobic bullying.
The message was clear: anyone can bully, any can be victimized by bullying, but together we can stop it. -from http://www.dayofpink.org/
My school board goes all out to recognize and celebrate diversity in the schools and community every day, but especially on April 11th! All 45 of my Grade 2s (I co-teach, don't worry, class sizes aren't normally this ginormous) wore pink - except some boys who opted for red and white instead, because red + white = pink - smart kiddos!
Teachers showed their support by wearing pink too - of course I did my nails to match ;) iPod quality pics, hope you don't mind!
Today's manicure is the entirely impractical Caviar slash Fish Egg manicure... I like to call it "Tiny Bubbles" because that's pretty much what it looks like! I got the microbeads from Michaels (on sale, too! - Regular $11.99 for a pack of 6 colours, 50% off this week) - check the scrapbooking section.
To apply a fish egg manicure, start with one coat of your base colour (I used Essie Smooth Sailing). Once dry, apply a second coat of medium thickness. Immediately pour microbeads on the wet nail, over some sort of container to catch the loose ones (which can be reused). Gently pat the beads into the wet polish with your finger, and pour some more beads to fill in any empty spots. Do one nail at a time. When finished, add a clear top coat at the tip of your nail to help prevent beads from coming loose.
I would recommend against putting a top coat over your entire nail. You will loose the texture and shine of the beads, plus they will be a pain to remove. when I was ready to remove the beads, I used a metal cuticle pusher to gently scrape them off, and used acetone to take off the remainder. It was easy!
These photos were taken the day after I did this, and you can see that some of the beads have fallen off (but not many). Although I do love the way this looks, the feel of added thickness to my nails weirded me out, plus I felt handicapped when it came to certain things like opening packages and peeling stickers off of my produce (lol). I will try this out again, but only for special occasions. I have since removed the beads from my nails, and I am finding them everywhere... in my bed, nestled in my hair, in my food... yikes! lol
As with most of the tween population, this weekend I squee-d over the movie premiere of the Hunger Games. I don't fit that demographic (I'm 26... *waves*), but I got sucked into the craze! I recently read the book trilogy and the movie exceeded my high expectations. Naturally, I painted my nails to look like the girl on fire...
This was inspired by a lot of Hunger Games manicures that have been floating around the nail blogs this week. The mockingjay accent nail was by far my most ambitious free design, but I saw other ladies had done it so I went for it!
I saw this mani on Polish and Pearls this week and had to try it out myself! Although I am not a fan of rose gold accented accessories and jewelry, something about this on my nails was different - I love this look. It's very shiny, especially when topped with a coat of Seche Vite.
Two coats of OPI's Designer de Better with another two coats of Essie Luxeffects A Cut Above on top. Designer de Better is a silver-based metallic with copper flecks. Paired with the pink glitter in the Essie topcoat, the combo comes off as a metallic rose gold. It's very pretty and worth trying out yourself!
I've always been attracted to the bright colours and whimsical designs by Betsey Johnson, and that was what drew me to this collection! I'm glad that I splurged on it :) Here are my swatches of the minis.
XOX Betsey - A nude with slight purple undertones. This is a winner of the collection for me. The first coat of went on a bit streaky, but it smoothed over with the second coat. Really pretty!
Yellow My Name is Betsey - a bright yellow creme. It's not necessarily my colour, but I still see myself rocking this in the summer! Nice application after 2-3 coats.
Pushing Your Luck - Bright red creme. Went on REALLY nicely! One coat was almost enough, two coats made it perfect. Classic red, beautiful.
Son of a Gun - Actually more blue than this photo shows. This is probably my least favourite of the collection. It needs 3 coats, or else it's too sheer and shows the visible nail line. Even though this colour isn't for me, I don't hate it and I can see it looking good on other people!
Too Too Turq - One of my favourites! The collection is worth it for this polish alone. I have many turquoise and teal polishes, but none like this. It has a lighter blue shimmer, and it applies like BUTTER! Amazing coverage with 2 coats. <3
Alley Cat - The other star of the collection! Just like Too Too Turq, it has a slight shimmer, and the application is wonderful. After swatching all of the polishes, this is the one I'm keeping on!
I dug out my dotting tool and decided to create a cool-coloured gradient made entirely out of dots! I used China Glaxe Re-Fresh Mint, and Electric Beat, plus Kiko 344 and my favourite blue, Nails Inc. Belgrave Place. The base is a mix of a few silver and shimmer polishes I have.
Out with 2011, in with 2012! I am SO done with last year and looking forward to lots of great things for the year to come. I haven't updated in a few months, but that doesn't mean that I haven't been doing my nails ;) Back in December I did a cute snowy manicure inspired by Nailside's design...
I also tried 3D nail decal stickers from Sally's. I hated the texture of these and removed them right after snapping a few pics!
Last night I got around to trying a manicure I had been wanting to attempt for a long time - a full on (double!) rainbow gradient. I was intimidated to try this. I had only ever done a maximum of 3 colours in a gradient, and I was looking at using 6 to get the effect that I wanted. My nails are at a good length now, so last night I finally decided to go for it. Here are the polishes that I used:
Zoya Marley, OPI Pink Friday, random orange OPI (oops! no label!) mixed with white*, Essie Barbuda Banana, Picture Polish Honey Dew, and Essie Borrowed & Blue
*I really need to get a pale orange!
I apologize that my thumbnail looks a little gnarly... I am mending a crack with a tea-bag patch - I'm pretty new at this but it's holding up well! Here are a few more pics. I'm really happy with how this manicure turned out!
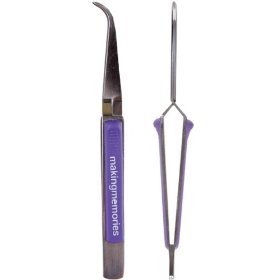
I want to share one tip with you... this is the best thing that I have come across to help me with sponging. When I sponge a gradient on my nails, I like to cut up a makeup sponge into tiny pieces in order to get the most of it. The pieces are difficult to hold, especially with freshly-painted nails. I tried regular tweezers, but these proved difficult too, since you have to continually squeeze so you don't drop the sponge. Enter these tweezers:
I believe that they are sticker tweezers, from a company called Making Memories. I bought them at Michaels Craft store years ago. They are reverse tweezers, so by default they are in a closed position, and you only have to squeeze to release the grip and open the tips. This is great for sponging, since you can loosely hold the tweezers like a pencil and not strain your wrist or risk ruining your mani :)